Showing posts with label Science/Math. Show all posts

April 27, 2011

It's 2am, TIME FOR A SCIENCE EXPERIMENT

Somehow, at the same time, my a friend and I both decided to be bewildered about how fresh water floats on salt water and stays separated. So, being good scientists, we decided to test it in lab my room. IMMEDIATELY.

We started by heating up water and saturating it with salt and then bringing it back down to room tempurature. I can now tell you that saturated salt water solution tastes horrible. I think that's why you aren't supposed to eat things in lab. We put blue food coloring in the salt water as an indicator. And, finally, we poured clear fresh water carefully on top. My friend had this clever way of pouring it through a paper towel as to minimize disturbances. And then we let it sit. For like a week. Basically, until I got sick of it sitting on my desk.

Here's how it started, at 2:30 am.

We were amazed that it was still separated at 2:33 am. Don't ask us why.

At 2:40 am we decided to start a new one, this time with a mixed zone. The yellow is fresh water, the blue is salt water, and the green is the two premixed together.

And at 2:50 we decided our science wasn't valid because we didn't have a control. So, we carefully poured yellow fresh water over red fresh water, resulting in none other than...
...orange.
And at 3:40 am, the colors were still well separated.

When I woke up the next day at 12:30 pm, they were STILL SEPARATED. Except the orange, because we didn't reach any entropically unlikely states. :(.

And at 5pm, they were still separated.

At this point, we were pretty convinced that fresh water does in fact float on salt water. It got really boring from this point on - nothing changed. After a week, everything looked exactly the same as when we started.

But, it didn't taste the same. Before we poured it off, I decided to use a straw and taste the layers. The fresh water was salty. It was really gross. But the dye was still separated. So, we learned that salt diffuses faster than dye, but have no clue how fast that happens because I was unwilling/didn't think to taste it every now and then.

Yay for food grade science.

April 17, 2011

Pi Hat


Difficulty: Medium
Time: 17 hours
Price: $15

I needed a hat to match my pi scarf. Using the same colors, I followed a hat design someone else created and made my own chart. The original pattern can be found here. Or here on Ravelry. Follow that and just use the pi charts.

Needle Size: 8 US (5 mm), 16" circular and also dpns
Yarn: Worsted, contrasting colors

Besides the charts, I did change some stuff for my hat, like the brim. In the original pattern, it wants you to make a knitted hem. I have no clue what this means (I've been knitting for about 4 months) so I decided to double knit it instead because that seemed like a good idea. Here is the pi brim chart:

It's worked from the bottom up in the round.

This is the new chart I used for the rest of the hat.

That's all you need to know to make the hat!

While doing this project, I learned that knitting on public transportation makes you SO INTERESTING EVERYONE WANTS TO TALK TO YOU. I think it's because when there aren't crazy people on board, riding the subway or bus is really boring. And they all think that what you are doing is incredibly hard and amazing - probably because I had two colors at once and all the dpns in, so the hat looked super complex even though it wasn't.

Here are some detail photos.

And here is the view your brain sees:

March 20, 2011

Pi Scarf


Difficulty: Easy
Time: 22 hours
Price: $20

This pattern is available as a PDF! And can be found on Ravelry!

I like pi a lot. In fact, I like pi far too much. It's been that way since 5th grade, and that's quite a while. My desire to make a scarf like this is why I always wanted to learn how to knit. So, I had youtube teach me to double knit and then I was all ready. Once you finally cast on the doubleknitting, the scarf is super easy and all it takes is time. Flying across the country twice in two weeks is good for that. Plus, knitting on airplanes makes you the most interesting person ever.

Anyway, the pattern:
Needle Size: 13 US (9mm)
Yarn: Bulky, contrasting colors
Brand: Loops and Threads Charisma
Skeins: Two of each color.
You could use just about any yarn weight and needle size depending on how thick and long you wanted the scarf. Mine turned out to be 42 digits long, about 7½ feet long and 6 inches wide.

The entire scarf is double knit. The pattern is super easy. Each number has two rows between it. The chart shows the start of the scarf, 3.1415, and then the remaining digits you need.

Here’s some mathematical constants to a bunch of places. Have fun!
Pi = 3.14159265358979323846264338327950288419716939937510582097494459...
 
e = 2.7182818284590452353602874713526624977572470936999595749669…
 
phi = 1.6180339887498948482045868343656381177203091798057628…
 
Prime numbers = 2 3 5 7 11 13 17 19 23 29 31 37 41 43 47 53 59 61 67 71 73 79 83 89 97 101…. Now you are all ready to contact aliens.

Just keep going with numbers until you have a scarf that's long enough, or you get sick of your project or you run out of yarn! Here's my 42 digits, it was a good number to run out of yarn on:

November 11, 2010

K'Nex Tower and Squashing the Achievements of Small Children


Our school decided to give us a day off for Veteran's Day. Which was nice. My friends and I decided to go to the science museum for the afternoon since we get free admission. We were expecting to just browse the kiddie exhibits and say "Hey! We know that!" all day and critique what they were trying to teach us, but instead we encountered the traveling K'Nex exhibit.

Our engineering senses tingling, we entered the exhibit and found out that there was a tower building contest going in.

What better way to flex our design muscles than to build a tower that reached the ceiling and squashed the records set by the small children at the museum?

We also saw that some folks from our school had set some decent records and left taunting messages, so we had to beat those, too. After all, they had done engineering a shame by not building until the constraints of the ceiling got in the way.


Our lofty goals in mind, we started construction. We started out with a slowly expanding modular pattern. After this reached about 10 feet long, we discovered it was getting a little too wobbly to continue. Undeterred, we added more and more reinforced layers.

Soon, another constraint was creeping up on our design goal - limited resources. The exhibit was running out of red rods! Oh noes! But it didn't matter. Our goal was reachable by adding a ridiculous spire at the top.

After two hours of construction, we were ready to stand up our tower. We separated it into three pieces, and as the token tall person, I got to put them together while standing on a chair.


Fellow museum goers applauded our efforts and kindly took our pictures, but alas, there was no prize.

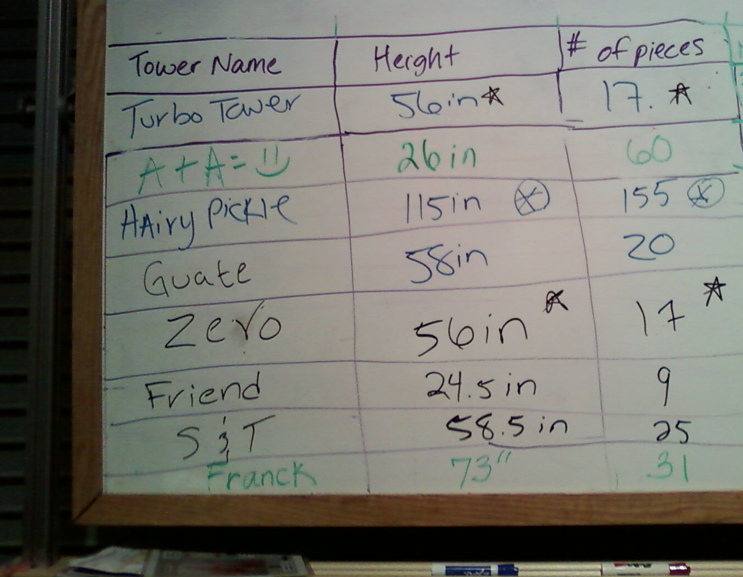
For completeness sake, we measured the tower and counted the pieces. It came in at a record breaking 199.25". I insisted we measure it in people, and found it was three friends tall.


Based on how fast the four of us worked, I estimated there were 800 pieces in the tower. The actual answer? 748!


We win. Take that small children.

May 22, 2010

Boffer Weapons


Difficulty: Medium
Time:
1-4 hours per weapon
Price: Less than $10

Mock combat is super fun. Boffer fights are great, because they are generally hilarious, are easy to make absurd, and don't bruise (or cost) as much as paintball.

Making swords and keyblades and quarterstaffs and pillows on sticks is straightforward - there are plenty of tutorials around the internet. They also have safety guidelines, because when you die in real life, you also die in game. Funny how stuff like that works.

As for materials, I used PVC pipe for the cores of all the weapons, pool noodles as padding, and duct tape to cover them up. For the decorations, I used random pieces of foam, colored duct tape and electrical tape.


I found that I didn't need any kind of dowel core in the PVC to keep it from being flimsy because the pool noodles were thick enough, and the core just made it heavy and unbalanced. I had previous bad luck with foam pipe insulation because it was too thin. The pool noodles work great, but you can only really buy them in the spring....

At the time, I was suffering through my first semester of quantum. To be the bane of all physics majors, I made Bra and Ket.


I also wanted a keyblade. It's been useful. The handle and the key part were cut from the foam that came from some kind of packaging.


And a lightsaber.


Adding the handles or crosspieces or axe blades adds a lot of time to making the boffers. But the possibilities are endless. The most terrifying weapon I've seen is the pillow on a stick my friend made - it was an ENTIRE foam mattress pad that was going to get thrown out wrapped around a PVC pipe and wrapped up in duct tape. It didn't hurt when it hit - it just knocked all the air out of you. I am personally a fan of more elegant weapons. From a more civilized age.